Computers and software have been indispensable for the vast majority of producers and sound designers, both amateur and professional. As computers continue to get faster, the limits of what you can accomplish on them with almost any Digital Audio Workstation (DAW) is only limited to your imagination. Additionally, it is now less expensive than ever before to get started. However, there are so many programs, plug-ins, MIDI control surfaces, and audio interfaces to choose from that it can often be a very daunting task selecting what you need!
This article is directed towards people who are on a very tight budget yet still looking to get into audio production. Although it IS an investment, it is possible to have a fully functioning studio for just a few hundred dollars, and with enough dedication to traversing the Internet, it is possible to find plenty of free resources, including plug-ins and even decent quality samples.
One of the tricks to getting the most for your money is buying second-hand WHENEVER possible- you can save a great deal of money from using eBay and Craigslist; I can definitely speak for myself here because almost everything I buy is second hand. Of course, be sure to do some research on the seller beforehand by examining their feedback; and always remember that if something looks too good to be true, then it probably is.
Although it is out of the focus of this article, I’m already assuming that everyone here owns a computer. Without getting into the ever-so-tiring PC vs. Mac debacle, I suggest you stick to the operating system you’re familiar with. Macs are fairly more expensive, and there are more freeware programs available for the PC, but aside from this, both platforms accomplish basically the same thing. Remember that you don’t necessarily need the latest and greatest sled for audio work either. Honestly, an older Intel Core Duo circa 2006, or even a multi-processor Mac G5 or G4/MDD will get the job done (albeit without the ability to run the absolute latest software, but the latest isn’t always necessary anyway). Just make sure you have at least 2 gigs of memory and lots of available hard drive space.
So let’s start with the DAW. The DAW is basically the heart of your studio. It’s where you will be editing and sequencing all of your audio samples and MIDI notes. It’s also the host of all the external plug-ins (VST’s) that you will be using, which we will cover later on. There are MANY different DAWs on the market today, and which one is the best has been a subject of intense debate since the dawn of computer-based production. Here are a few options for less than $100:

Ableton Live Intro: Ableton Live has exploded in popularity during the past several years, part of which is attributed to its ability to be used both as production as well as a performance tool. Last week Ableton launched a slimmed-down version of their flagship program titled Intro. Live Intro actually utilizes the same engine and session/arrange interface as the full Live and many of the same effects as well, sans the ones introduced in version 8 (vocoder, limiter, etc.) The main limitation is that you are only allowed to use 12 effects and 10 VST instances in a single project. However, a good habit to get into is to restrict yourself from using too many insert effects in a project, as they’re not always necessary. For example, you should use one reverb instance on a send channel, instead of multiple ones on individual channels. The download of Intro is only $99!
FL Studio 9: Although I am not very familiar with FL Studio (Fruity Loops), it is a very popular PC-based program that has added tons of internal instruments and effects over the past ten years of its development. The DirectWave sampler, 64-channel mixer, slicer tool (which chops breakbeats for you to re-edit drum loops), Edison recording tool, MPC-like FPC, and SynthMaker (which is fully modular for unlimited synthesis possibilities) proves that this is a very powerful tool. Except for SynthMaker and Slicex, the vast majority of FL Studio’s tools are available in the “Fruity” edition of version 9, which is available for download on their site.
Renoise: Trackers often create a lot of blank stares and deer-in-headlights expressions when discussing them with fellow producers. They are widely attributed to having a much higher learning curve, especially for beginners, because the interface is completely different from the standard channel-based interface we are so accustomed to in a DAW. However, once understood, there is a great deal of power in this interface, and Renoise is hands down the most powerful tracker-based program available. For less than $100 you can purchase the entire program, which includes a full pattern editor, mixing console, sample editor, and support for most VST instruments. They have a vast community on their site for troubleshooting, and are one of the few DAWs that totes a Linux version!
WAV editors are also a helpful tool to have. It is often more cumbersome to extract sections of a raw audio file for use in your compositions within your host DAW and often makes practical sense to use a more lightweight WAV editor instead. Audacity is a FREE .wav editor that is available on both Mac and PC. It can run on any computer made within the past decade, and can even support VST plug-ins in case you want to use effects on them. I use Audacity all the time and honestly cannot say enough good things about it.
VST’s: Virtual Instruments are what producers use to extend the capabilities of their host DAW programs. For example, I have the full Ableton Suite, which has almost all of the tools and resources I need to make a song. However, there are times I want to use a different synth, or run a different effect not bundled with Live, and will use a VST instead. They are very easy to incorporate into your host program; every parameter you control in your VST can also be controlled and edited on the sequencer of your host DAW as well. There are literally thousands of DAW’s out there; here are a few free and very inexpensive ones to get you started:
TAL Series: Togu Audio Line (TAL) has about 20 different filter plug-ins available on their website, including a vocoder, bit crusher, reverb, phaser, and various synths (the most popular one being based on Roland’s legendary SH-101).
Applied Acoustics System Ultra Analog VA-1: For a mere 15 dollars, this is a no-brainer deal. Ultra Analog is a fully functional subtractive synthesizer that includes 2 oscillators, an arpeggiator, onboard effects, a variety of waveforms, LFO’s, ADSR envelopes, amongst other things. A soft synth like Ultra Analog will pretty much allow you to create any sound you want from scratch; for a new producer, this is something I cannot recommend enough. This synth used to cost over $200!
Drum core Free: The Free version of Drumcore’s audio/MIDI-based drum editing application allows you to run this program as a VST instance to help aid in laying down drum and percussion tracks and develop some grooves. Although it does not come with the sample library the full version does, the ability to layer your own breaks and import your own samples and hits are there. A must-have for a free program.
Computer Music Monthly: Although the $16 cover price of each CMM magazine may seem a little steep, the software provided on the covermount DVD more than makes up for it. Each issue not only comes with high-quality 24-bit Wav samples (each issue focuses on a different genre of music) and video tutorials but also the ever-expanding CM Studio software bundle. The CM Studio includes the Blue Cat spectrum analyzer, the Zebra and Alpha subtractive soft synths, reverb and delay units, Sugar Bytes Artillery, and a slew of other goodies! There are a few components that are only PC or Mac Power PC (G4/G5) compatible, however.
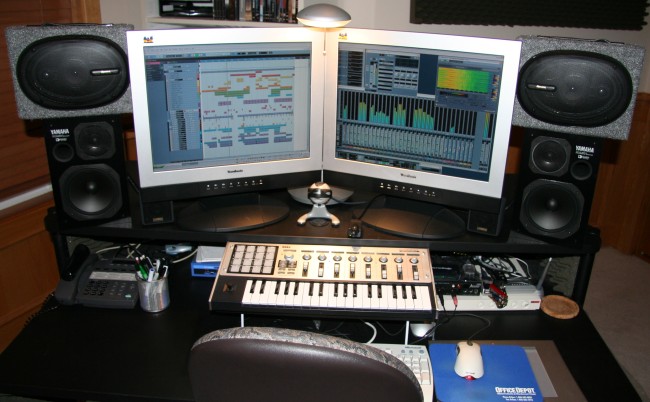
MIDI Control Surface: It is highly recommended that you purchase some sort of keyboard. Most midi keyboards have either 25, 37, 49, or 61 keys (2, 3, 4, or 5 octaves respectively); the more keys the more expensive they obviously get. I would recommend getting one that has knobs, faders, or pads built-in, these can be mapped to any parameters you wish in your DAW and plug-in. The knobs are great when you’re working with soft synths; the mouse can be very cumbersome when trying to craft your sounds. For under $100 you can pick up a 49-key M Audio KeyRig, and for a bit more you can add knobs, faders, etc to your arsenal on surfaces such as the M Audio Axiom series, E-MU X-board, or Edirol series, still for under $200. And why not check out eBay while you’re at it? Many of the boards in the $200 range can be had for roughly half the price second hand, and an older bread-and-butter M Audio can be bought for less than $50 if you’re patient enough to track one down.
Also, if you lust for an Akai MPC for percussion work but (like the rest of us) the $1000+ price tag puts you off, check out the MPD-16’s on eBay. Second-hand ones have sold for as little as $50 on there, and you get your standard 4×4 grid of velocity-sensitive pads to work within your host program!
Audio Interface: You need an audio interface to transfer external sounds into your computer, as well as to hook up your speakers. Almost all interfaces these days are external and hook up to your computer via USB 2.0 or Firewire. A good interface will have at least 2 pairs of RCA stereo inputs, as well as one pair of MIDI ins/outs, and the ability to hook up a microphone. The least expensive ones include the Fast Track series by M Audio and the Behringer FCA, however, I have heard many mixed reviews about these boxes. I would recommend going a bit beyond the $100 level here and investing in a device such as the Tascam US-122, Lexicon Lambda series, or Edirol UA-4FX.
Samples: In the infancy of the Internet, it used to be very difficult to track down source material for sampling; nowadays the opposite problem exists. There is so much content out there; some of it is exceptional, some absolute garbage. One thing I cannot recommend enough is to try tracking down your own samples the old-fashioned way, by digging through crates at record stores, thrift stores, and garage sales (if you own a turntable). There are hundreds of thousands of old and obscure records out there that many people have never thought to utilize before for collecting samples- why not do some digging and track down some of your own sounds? Online sample packs can be expensive, so spend your time offline trying to find them. Don’t forget that you can use a soft synth to create your own sounds from scratch; many have white noise oscillators built in that you can craft all sorts of things from drums, to “swooshing” sounds and other fills.
Backup External Hard Drive: A lot of producers starting to try to skimp on extra computer hardware, however with 500 gig external hard drives easily had for $50 these days, there is absolutely no reason why you shouldn’t get one (or even 2). Many people don’t think to have some sort of back-up system in place until they experience a computer crash. Hard drive crashes will happen when you least expect them to, and that is a definite WHEN and not an IF. To not have a backup system in place for both your sample library as well as your finished projects is inexcusable, you need to start one today. If you work off of a laptop, an external hard drive is also great to run all of your content from; with many laptop drives running at slower speeds (5400 rpm), you will have a significant performance boost if you work off of a much faster external drive (7200 rpm).
Monitors: Out of all components you add to your project studio, the one thing you really cannot skimp on are studio monitors. You really get what you pay for when you purchase speakers; the higher-end monitors color the sound much less and deliver a flatter frequency response, which is what you want when it comes to equalizing your work. Similar to DAWs and Computer platforms, the subject of which one is the best can be argued to death and is entirely subjective, every producer has a different idea of what works best. The Tapco (Mackie) S-5’s are a good starting point; however, their frequency range only goes down to around 64 Hz so if you’re producing bass-heavy music (especially dubstep or DNB) it is highly recommended that you either get a subwoofer or upgrade to the more powerful S-8’s. Yes, these will set you back several hundred dollars, but again, with monitors, you absolutely get what you pay for. Adams, Genelec’s, even the Mackie HR-624’s maybe a bit out of the price range of an entry-level producer, but the Tapco’s are a good place to start.
It is indeed true that in most cases you CAN make more with less, so don’t think you have to take out a loan to start working with audio. Keep in mind that in the late 1980s/early 90s, producers were very utilitarian with working around the limitations of their samplers, synthesizers, and sequencers- often forcing them to find creative solutions while maximizing every last kilobyte of memory inside their machines. Working with what may initially seem like a restrictive production environment can often inspire you to find different solutions just from the sheer simplicity of your setup. At the end of the day, nobody wants to be perplexed by all the different software options out there, we just want to make music!
Stay tuned; in a few weeks, I will also be writing a post showing some second-hand hardware you can buy very inexpensively as well, in case you are interested in more of a hands-on approach to production.